
How to
Installing the AD v1 Tablet and Frame
You install the AD v1 tablet and the frame on the base to install AD v1 on a control cabinet or a wall and to provide the tablet with a protective frame.
AD v1 provides a Human Machine Interface (HMI) for local access to the EcoStruxure BMS servers.
AD v1 is based on an Android platform with a high-resolution touchscreen display. The display size is 10 inches.

Stationary HMI Terminal
AD v1 is intended to be used as a stationary HMI terminal. For example, AD v1 can be installed on a control cabinet in a plant room or it can be installed on a wall in a hospital.
Kiosk Mode
AD v1 is preinstalled with SmartXKiosk, which allows you to lock AD v1 into Kiosk mode to prevent users from accessing other apps than the one you have downloaded and selected. For more information, see SmartXKiosk Overview .
AD v1 Bundle
AD v1 is delivered in a bundle, which contains a protective frame. When assembled, the frame protects against dust, moisture, and mechanical damage. The USB cable is ordered separately from Schneider Electric.
The frame and its base do not provide protection against theft.
Installation Options
The protective frame has a base, which is equipped with hole mount patterns to support a variety of installation options. For example, AD v1 can be installed on a control cabinet, on a wall, or on a VESA stand that fits devices with a 100 x 100 mm (3.94 x 3.94 in.) hole pattern.
AD v1 Communication and Power
AD v1 can use either a wired (USB) connection or a wireless (WiFi) connection to communicate with EcoStruxure BMS servers. AD v1 can be powered either by a AS-P server, AS-B server, or USB power adapter.
For more information, see AD v1 Communication and Power .
Preinstalled Apps
AD v1 is delivered with the following set of preinstalled apps:
SmartXKiosk for locking AD v1 into Kiosk mode
AD-Link for enabling IP over USB communication
For more information, see AD-Link Overview .
Technician Tool for operation and maintenance of EcoStruxure BMS servers
Specifications
| Electrical | |
DC input current consumption
|
500 mA to 1.3 A
|
DC input supply voltage
|
5 VDC (USB)
|
| Environment | |
Ambient temperature, operating
|
5 to 35 °C (41 to 95 °F)
|
| Material | |
Enclosure
|
UV stable ABS
|
Ingress protection rating
|
IP 54
|
Plastic flame rating
|
UL94 HB
|
| Mechanical | |
Dimensions (W x H x D)
|
266 x 203 x 19 mm (10.5 x 8.0 x 0.75 in.)
|

|
|
Weight
|
0.656 kg (1.446 lb)
|
| Communications | |
USB
|
1 USB 2.0 port
|
WiFi
|
802.11 a/b/g/n 2.4 + 5 GHz
|
| CPU | |
Frequency
|
1.2 GHz
|
Type
|
Quad-core
|
Internal memory
|
1.5 GB RAM, 16 GB ROM
|
| Operating system | |
Supported versions
|
Android 4.4 to 4.4.4 (KitKat)
|
Android 4.4W to 4.4W.2 (KitKat)
|
|
Android 5.0 to 5.1 (Lollipop)
|
|
| Display | |
Display resolution
|
1280 x 800 pixels
|
Display size
|
10.1 inches (256 mm)
|
Display type
|
TFT LCD, touchscreen
|
Insert the USB cable into the tablet's charger/accessory port.
action_zoom_plus_stroke 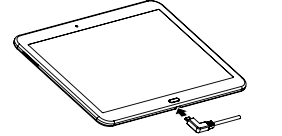
Tilt the tablet and fit the top of the tablet to the ribs inside the frame.
Push the tablet into place inside the frame.
Fit the mounting brackets and the pan head screws (M4 x 0.7 x 8 mm) to the screw inserts inside the frame and tighten the screws.
action_zoom_plus_stroke 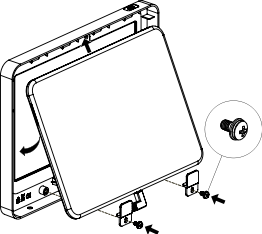
Thread the USB cable through the center hole (cable grommet) in the base and through the hole in the cabinet.
Fit the ribs inside the top of the frame to the base and hook the frame assembly onto the base.
Push the frame assembly onto the base.
Fit the security screws (M4 x 0.7 x 10 mm) to the screw inserts at the bottom of the frame assembly and tighten the screws using a T20 Security TORX screwdriver or bit.
action_zoom_plus_stroke 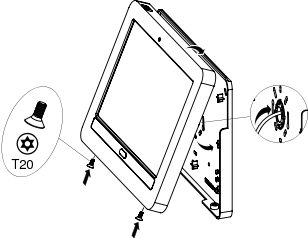
You can now make the required connections for power supply and communication with the automation servers.
 AD v1
Installing the AD v1 Base on a Cabinet
Installing the AD v1 Base on a Wall
Connecting Advanced Display to a Power Adapter
Connecting an Advanced Display to an AS-P server or AS-B server
AD v1
Installing the AD v1 Base on a Cabinet
Installing the AD v1 Base on a Wall
Connecting Advanced Display to a Power Adapter
Connecting an Advanced Display to an AS-P server or AS-B server
 AD v1 or AD v2 Does Not Turn On or Battery Does Not Charge