-
Content
arrow2_down -
WebStation
-
WorkStation
-
Registration Portal
- Touch Screens
-
Engage
-
Enterprise Central
-
Enterprise Server
- SmartX Servers
-
License Server
- 管理员工具
- SmartX IP Controllers
- RP Series 扩展模块
-
SmartX Zigbee 适配器
-
SmartX Sensor
- 电源
- I/O 模块
-
Builder View
-
Graphics Editor
-
Script Editor
-
Builder for Function Block
-
Function Block Editor
-
Project Configuration Tool
-
Project Configuration Tool
- 移动应用程序
-
支持工具
-
TAC Vista Conversion Tool
-
Continuum Conversion Tool
-
WebReports
-
WebHelp
- WebHelp 概览
- 安全信息
功能
产品

如何
Changing the Temperature Setpoint
In the SpaceLogic Sensor LCD Temperature Sensor model, you change the temperature setpoint to increase living space comfort by using the available buttons. You enable the temperature setpoint by configuring the Display object Allow setpoint changes , followed by the Setpoint hig h limi t and Setpoint low limit properties. In this way, you can use the desired setpoint to control applications through the Setpoint property.
You use the SpaceLogic Sensor Display property tabs in WorkStation to view and configure the UI features of the various sensor models within your control application.
The Display Basic tab properties includes the same General Information you find on all EcoStruxure Building Operation objects. Beyond that, it also provides a Setpoint , a Fan speed , an Occupancy override , an HVAC mode , a Heating cooling status , and 4 Custom value text fields. In addition, there are several properties that allow you to control the temperature display. For example, the Temperature display mode allows you to configure the temperature value displayed on the SpaceLogic Sensor display in its passive display state with the following settings:
Live Temperature : Displays the space temperature measured by the SpaceLogic sensors internal temperature sensor
Temperature setpoint : Displays the current setpoint temperature value
Custom temperature : Displays the value of the Custom temperature property
The Custom temperature property then allows you to display any value in the temperature range, either by referencing another temperature source (for example, an external temperature sensor) or by setting it manually in the Custom temperature field (warm start retained only).
The Display Advanced property tab includes considerably more configuration information. For example, you turn on the Allow menu page property to display all submenus including the Functions menu and any of its submenus. Should you wish, you can enable the temperature setpoint feature by setting the Display object Allow setpoint changes property to On and configuring the Setpoint high limit and Setpoint low limit properties. If colored wall back lighting feedback is required for the room occupant, you can turn on the Enable wall back lighting property.
Allow setpoint changes, Setpoint high limit, and Setpoint low limit are the types of properties you may wish to drive dynamically based on time of day. For example, using a schedule, you may only allow setpoint changes during the day and not at night. You may also only change the high and low limits for the setpoint based on whether you are in the heating or cooling season.
In addition, you can use the Occupancy override icon property and its Command and State options as follows:
Command : When occupied, the house is empty. When clicked, the Command to vacate or unoccupy is sent.
When unoccupied, the house displays with a person inside. When clicked, the Command to occupy is sent.
State : When the house displays with a person inside, it indicates the current state is occupied. When clicked, the State command to unoccupy is sent.
When unoccupied, the house is empty to indicate its current state. When clicked, the State command to occupy is sent.
Finally, you can enable lighting and blind control functions using the Display object Allow light control and Allow blind control properties. Within the light function, you can toggle on and off or set a percentage to control the intensity of the lights using the Lighting mode property. Similarly, you can you can toggle on and off or set a percentage to control the blind louver sub-function using the Blind control mode property.
For more granular control, you can use the Light and Blind Control tab to specify the 4 supported light groups, and the blind position and angle for the 12 supported blind groups in the SpaceLogic Sensor. You can also use the Light forced disable and Blind forced disable properties as an override or a forced disable.
In this tab, you can enter the Default light group or Default blind group value corresponding to the Light and Blind Control tab Light 1-4 level and Blind 1-12 position properties. For example, if you select Default light group or Default blind group equals 1, you direct the Remote Control to affect the Light 1 level and the Blind 1 angle and Blind 1 position properties.
The Display Button and Scene Configuration property tab allows you to select from the available functions or scenes to program the buttons on the SpaceLogic Sensor display models. You can also select the buttons you wish to display for configured scenes and triggers for each of the scene buttons.
有关更多信息,请参阅 Configuring SpaceLogic Sensor Display Properties .
Property Mapping
While the Display property tabs allow you to configure varied SpaceLogic Sensor models with different UI features, not all of the properties apply to each model. Be sure to consider this when configuring the application and binding it to your control programs. The table that follows shows the properties applicable to each unit.
表格: SpaceLogic Sensor and Display Object Property Mapping
|
Display property |
Touchscreen Display |
LCD Temperature Sensor |
3-Button Cover |
|
Display property |
Touchscreen Display |
LCD Temperature Sensor |
3-Button Cover |
|
Setpoint |
Yes |
Yes |
Yes |
|
Fan speed |
Yes |
Yes |
No |
|
Occupancy override |
Yes |
Yes |
Yes |
|
HVAC mode |
Yes |
Yes |
No |
|
Selected scene |
Yes |
Yes |
No |
|
Light level |
Yes |
Yes |
No |
|
Blind position |
Yes |
Yes |
No |
|
Blind slat angle |
Yes |
Yes |
No |
|
Temperature display mode |
Yes |
Yes |
No |
|
Custom temperature |
Yes |
Yes |
No |
|
Heating cooling status |
Yes |
Yes |
No |
|
Show time |
Yes |
No |
No |
|
Time format |
Yes |
No |
No |
|
Show CO2 |
Yes |
Yes |
No |
|
Show humidity |
Yes |
Yes |
No |
|
Temperature units |
Yes |
Yes |
No |
|
Allowed fan speeds |
Yes |
Yes |
No |
|
Enable wall back lighting |
No |
No |
Yes |
|
Lighting mode |
Yes |
Yes |
No |
|
Blind control mode |
Yes |
Yes |
No |
|
Blind angle mode |
Yes |
Yes |
No |
|
Allowed HVAC modes |
Yes |
Yes |
No |
|
Allow setpoint changes |
Yes |
Yes |
Yes |
|
Setpoint high limit |
Yes |
Yes |
Yes |
|
Setpoint low limit |
Yes |
Yes |
Yes |
|
Allow fan speed changes |
Yes |
Yes |
No |
|
Allow occupancy overrides |
Yes |
Yes |
No |
|
Allow HVAC mode changes |
Yes |
Yes |
No |
|
Allow menu pages |
Yes |
No |
No |
|
Allow sensors information pages |
Yes |
No |
No |
|
Allow device information page |
Yes |
No |
No |
|
Allow parent information page |
Yes |
No |
No |
|
Allow custom information page |
Yes |
No |
No |
|
Allow temperature unit changes |
Yes |
Yes |
No |
|
Allow light control |
Yes |
Yes |
No |
|
Allow blind control |
Yes |
Yes |
No |
|
Display backlight |
Yes |
No |
No |
|
Button (1-12) function |
Yes |
Yes |
No |
|
Scene button (1-8) button |
Yes |
Yes |
No |
|
Scene button (1-8) trigger |
Yes |
Yes |
No |
|
SpaceLogic Living Space Sensor / Eco mode |
Yes |
Yes |
Yes |
In the SpaceLogic Sensor LCD Temperature Sensor, in the default temperature menu, press the
button.action_zoom_plus_stroke 
The icon blinks to indicate that you are actively editing the temperature setpoint.
action_zoom_plus_stroke 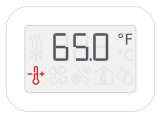
In editing mode, press the
oraction_zoom_plus_stroke  buttons to reach the desired temperature setpoint.
action_zoom_plus_stroke  提示:
提示:The setpoint may differ from the actual temperature reading.
The icon continues to blink while you are in editing mode.
Wait for six seconds for the setpoint to return to temperature.
The icon returns to a normal, solid grey and the numbers now denote temperature rather than setpoint.
action_zoom_plus_stroke 
请参阅
 SpaceLogic Display Properties
SpaceLogic Sensor LCD Temperature Sensor Model
Configuring SpaceLogic Sensor Display Properties
SpaceLogic Display Properties
SpaceLogic Sensor LCD Temperature Sensor Model
Configuring SpaceLogic Sensor Display Properties