earth_america
user_standard Iniciar sesión
action_search_stroke
earth_america
Log on to rate and give feedback 1 2 3 4 5 Log on to rate
0
Explicación de procesos

Explicación de procesos


Productos SmartX Sensor
Funcionalidades: Hardware, LCD
Versión del producto: 2.0, 2.1, 3.0, 3.1, 3.2
18/05/2018

Changing Heating and Cooling Mode Settings

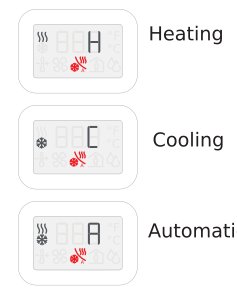
In the SmartX Sensor LCD Temperature Sensor model, you change the heating and cooling mode settings to enhance living space comfort. You enable this feature by choosing the Display object Heating cooling status property and its relevant option.

Mostrar más
action_close

You use the SmartX Sensor Display property tabs in WorkStation to view and configure the UI features of the various sensor models within your control application.

Basic and Advanced Property Tabs

The Display Basic tab properties includes the same General Information you find on all EcoStruxure Building Operation objects. Beyond that, it also provides a Setpoint , a Fan speed , an Occupancy override , an HVAC mode , a Heating cooling status , and 4 Custom value text fields.

The Display Advanced property tab includes considerably more configuration information. For example, you enable the temperature setpoint feature by setting the Display object Allow setpoint changes property to On and configuring the Setpoint high limit and Setpoint low limit properties. If colored wall back lighting feedback is required for the room occupant, you can turn on the Enable wall back lighting property.

Aviso

Allow setpoint changes, Setpoint high limit, and Setpoint low limit are the types of properties you may wish to drive dynamically based on time of day. For example, using a schedule, you may only allow setpoint changes during the day and not at night. You may also only change the high and low limits for the setpoint based on whether you are in the heating or cooling season.

You can also enable the occupancy override feature using the Display object Allow occupancy override property. In the Occupied mode, you then turn on a green back light if the Enable wall back lighting property is On .

Para obtener más información, consulte Configuring SmartX Sensor Display Properties .

Property Mapping

While the Display property tabs allow you to configure varied SmartX Sensor models with different UI features, not all of the properties apply to each model. Be sure to consider this when configuring the application and binding it to your control programs. The table that follows shows the properties applicable to each unit.

Tabla: SmartX Sensor and Display Object Property Mapping

Display property

Touchscreen Display

LCD Temperature Sensor

3-Button Cover

Setpoint

Yes

Yes

Yes

Fan speed

Yes

Yes

No

Occupancy override

Yes

Yes

Yes

HVAC mode

Yes

Yes

No

Heating cooling status

Yes

Yes

No

Show time

Yes

No

No

Time format

Yes

No

No

Show CO2

Yes

Yes

No

Show humidity

Yes

Yes

No

Temperature units

Yes

Yes

No

Allowed fan speeds

Yes

Yes

No

Enable wall back lighting

No

No

Yes

Allowed HVAC modes

Yes

Yes

No

Allow setpoint changes

Yes

Yes

Yes

Setpoint high limit

Yes

Yes

Yes

Setpoint low limit

Yes

Yes

Yes

Allow fan speed changes

Yes

Yes

No

Allow occupancy overrides

Yes

Yes

No

Allow HVAC mode changes

Yes

Yes

No

Allow menu pages

Yes

No

No

Allow HVAC mode changes

Yes

Yes

No

Allow menu page

Yes

No

No

Allow information pages

Yes

No

No

Allow temperature unit changes

Yes

Yes

No

Display backlight

Yes

No

No

SmartX Living Space Sensor / Eco mode

Yes

Yes

Yes

To change heating and cooling mode settings
  1. In the SmartX Sensor LCD Temperature Sensor default temperature menu, press the

     
    action_zoom_plus_stroke
    button to advance to the heating and cooling mode menu.

     
    action_zoom_plus_stroke
  2. Toggle between one of the available heating and cooling options using the

     
    action_zoom_plus_stroke
    button.

     
    action_zoom_plus_stroke
  3. Use the

     
    action_zoom_plus_stroke
    button to toggle through the options backwards.

  4. Select the desired speed and press the

     
    action_zoom_plus_stroke
    button to return to the default temperature menu.

    This also confirms your fan speed changes.

  • SmartX Sensor Display Properties
  • SmartX Sensor LCD Temperature Sensor Model
  • Configuring SmartX Sensor Display Properties