earth_america
user_standard Iniciar sesión
action_search_stroke
earth_america
Log on to rate and give feedback 1 2 3 4 5 Log on to rate
0
Explicación de procesos

Explicación de procesos


Productos RP-IO
Funcionalidades: Hardware
Versión del producto: 2023, 2024, 7.0
30/03/2023

Powering Up an RP-IO Module

You perform the following steps to power up an RP-IO module.

Mostrar más
action_close

The RP-IO module can be installed on a DIN rail or other flat surface inside a cabinet. The device is recommended to be installed in a cabinet, unless local regulations allow an exception.

Installation orientations

Under normal operating conditions of 0 to 50 °C (32 to 122 °F), the RP-IO module can be installed in the following orientations:

  • Horizontally (on a DIN rail going from left to right), with the device label text in the upright position reading left to right. See “a” in the following figure.

  • Vertically (on a DIN rail going from top to bottom), which means that the device is rotated +90 degrees or -90 degrees from the horizontal position. See “b” and “c” in the following figure.

  • Face down from a ceiling. See “d” in the following figure.

  • Up and down, which means that the device is rotated 180 degrees from the horizontal position and with the device label text up and down. See “e” in the following figure.

  • Face up on a horizontal surface. See “f” in the following figure.

 
action_zoom_plus_stroke Installation orientations for the RP-IO module models operated in normal conditions, 0 to 50 °C (32 to 122 °F)
Figura: Installation orientations for the RP-IO module models operated in normal conditions, 0 to 50 °C (32 to 122 °F)

Installation on a DIN rail

A DIN rail is a common and convenient technique for installing the RP-IO module along with other associated control and monitoring devices. The most efficient ventilation is achieved with the wall-mounted DIN rail oriented horizontally and with adequate space provided between the RP-IO rail and adjacent rails or other devices.

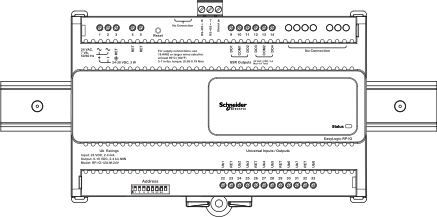
The RP-IO module is typically installed horizontally (on a DIN rail going from left to right), with the device label text in the upright position reading left to right.

 
action_zoom_plus_stroke Example of an RP-IO module installed on a horizontal DIN rail
Figura: Example of an RP-IO module installed on a horizontal DIN rail
DIN rail end clip

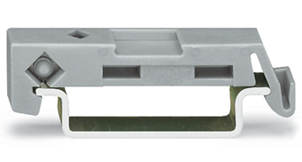
To help prevent the device from sliding down or sideways on the DIN rail, install an end clip for DIN 35 (part number SXWDINEND10001) tightly against the bottom or rightmost device on the rail. The end clip is easily removed if you bend the snap lock open with a screwdriver.

Aviso

EQUIPMENT DAMAGE

Use an end clip (part number SXWDINEND10001) when you install the device on a vertical DIN rail.

Failure to follow these instructions can result in equipment damage.

 
action_zoom_plus_stroke End clip for DIN 35 fixed across the DIN rail
Figura: End clip for DIN 35 fixed across the DIN rail

Installation in a cabinet

All RP-IO module models are recommended to be installed in a cabinet, unless local regulations allow an exception.

Aviso

The device should be installed within an enclosure such as a control cabinet for isolation to exposed live parts.

 
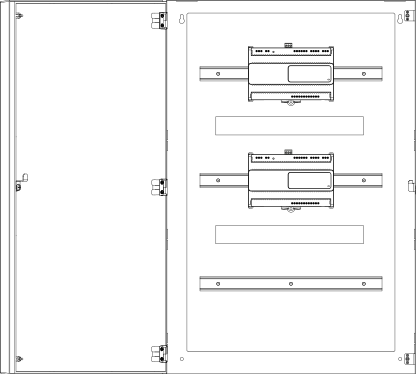
action_zoom_plus_stroke RP-IO modules installed on horizontal DIN rails in a cabinet
Figura: RP-IO modules installed on horizontal DIN rails in a cabinet

When installing RP-IO modules in a cabinet, it is recommended to provide ample space between the DIN rails and modules for sufficient ventilation.

Screw terminals

The RP-IO modules have fixed screw terminals. Para obtener más información, consulte RP-IO Screw Terminals .

Anchor points for cable ties

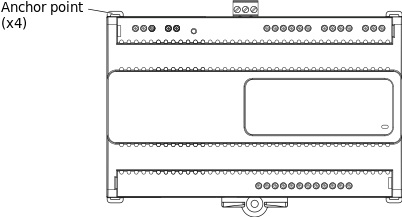
The RP-IO modules have four anchor points that can be used to fasten cable ties or other accessories for bundling wires.

 
action_zoom_plus_stroke Anchor points for cable ties
Figura: Anchor points for cable ties

Optional covers

The RP-IO modules can be equipped with optional covers to reduce access to the screw terminals and wires if desired.

 
action_zoom_plus_stroke Optional covers
Figura: Optional covers

Mostrar más
action_close

The RP-IO module is available in two models that only support BACnet MS/TP communication. These two models offer two different combinations (sets) of the number and types of I/O points. Both models support 24 VAC/VDC input power.

 
action_zoom_plus_stroke RP-IO model number structure
Figura: RP-IO model number structure

Tabla: RP-IO Models

Range

Model

BACnet

I/O–CPU Set

I/O Points

CPU Type

Input Power

EasyLogic RP-IO

RP-IO-12A-M-24V

MS/TP

12A

12

Single-core

24 VAC or 24-30 VDC

EasyLogic RP-IO

RP-IO-16E-M-24V

MS/TP

16E

16

Single-core

24 VAC or 24-30 VDC

Para obtener más información, consulte RP-IO Onboard I/O .

Para obtener más información, consulte RP-IO Module Built-in Power Supply .

All RP-IO models have the same small footprint as most of RP-C controller models.

The EasyLogic range differs significantly from the SpaceLogic range of products not only in terms of the supported BACnet communication protocol (BACnet/IP and/or BACnet MS/TP), but also with regards to several other features.

Aviso

The EasyLogic models have an “-M” in the product name.

Tabla: Features of the EasyLogic RP-IO Models

Feature

RP-IO-12A-M-24V, RP-IO-16E-M-24V

Built-in wireless connectivity

no

Ethernet ports

0

USB ports

0

RS-485 ports with RJ45 interface

0

RS-485 port with screw terminals

1 a

I/O and power input terminals/connectors

Fixed screw terminals

MS/TP address configuration

DIP switch

Room bus support

no

Sensor bus support

no

Modbus support

no

RTD sensor support

no

LED(s)

1 b

Real-time clock

no

Input power

24 VAC or 24-30 VDC

Power input type

Isolated

CPU type

Single-core

Memory (RAM / NOR flash / FRAM)

6 MB / 32 MB / 128 kB c

  1. Dedicated for BACnet MS/TP bus. Removable 3-pole screw terminal block.
  2. Status LED.
  3. RP-IO-12A-M-24V with hardware version earlier than 01 and RP-IO-16E-M-24V with hardware version earlier than 03 have a FRAM memory with a size of 8 kB. For these hardware versions, the use of Script programs is recommended to save FRAM memory space.

Aviso

EQUIPMENT DAMAGE

Before powering up the RP-IO module, ensure that the input power polarity is correct and that the voltage level meets the specifications of the module.

Failure to follow these instructions can result in equipment damage.

To power up an RP-IO module
  1. Check that all wiring is correct.

  2. Ensure that appropriate cable strain relief is provided, especially for wires that carry 30 VAC or 42.4 VDC or above.

    You can use the anchor points on the I/O module enclosure and cable ties to fasten and fix the cables.

  3. Ensure that the 24 VAC at 50/60 Hz or 24-30 VDC power is supplied to terminals 1 and 2.

     
    action_zoom_plus_stroke
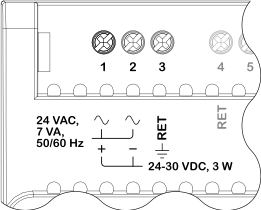
  4. Ensure that the ground cable is connected to terminal number 3.

  5. After powering up, check that the Status LED changes to a constant green light after about a minute.

    Para obtener más información, consulte RP-IO Module LED .

  • RP-IO Module Device Installation
  • RP-IO Models
  • RP-IO Screw Terminals
  • RP-IO-12A-M-24V Screw Terminals
  • RP-IO-16E-M-24V Screw Terminals
  • RP-IO Module LED
  • Status LEDs