earth_america
user_standard Log on
action_search_stroke
earth_america
Log on to rate and give feedback 1 2 3 4 5 Log on to rate
0
How to

How to


Products: MP-C, MP-V, SpaceLogic Sensors
Functionalities: Hardware
Product version: 2023, 2024
6/20/2023

Connecting SpaceLogic Sensor Devices to an MP Controller

You connect SpaceLogic Sensor devices to an MP controller to provide the sensor devices with power and communication from the controller.

Show More
action_close

The MP-C sensor bus allows SpaceLogic Sensor devices to be connected to the controller.

Note:

MP-C controller models with “-M” in the product name do not support the sensor bus.

Notice

LOSS OF COMMUNICATION

  • Ensure that the total length of the sensor bus does not exceed 61 m (200 ft).

  • Use a Cat 5 or higher unshielded twisted pair cable with eight conductors (four twisted pairs), a cross-sectional area of 22 to 26 AWG (0.34 to 0.14 mm 2 ), and a rating that meets the requirements of the target environment.

Failure to follow these instructions can result in loss of communication.

Note:

The labeling of the RS-485 port differs between different versions of the MP-C controller models. In previous versions, the port is labeled “Sensor Bus”.

By default, the MP-C controller's RS-485 Com A port is configured and allocated for the sensor bus. For more information, see Communication Ports on MP-C-15A, -18A, -18B, -24A, and -36A .

 
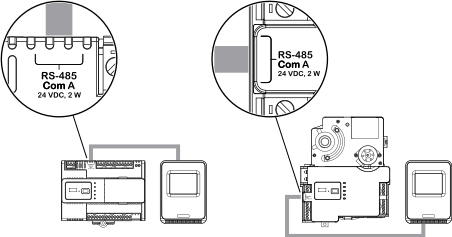
action_zoom_plus_stroke Location of the RS-485 Com A port on the MP-C controllers
Figure: Location of the RS-485 Com A port on the MP-C controllers
Note:

When connecting SpaceLogic Sensor devices to the sensor bus through a daisy-chain configuration, the sensor bus ports on the SpaceLogic Sensor are interchangeable.

Description

Model Number

Power (mW)

Sensor base with temperature sensor

SXWSBTXXXSXX

90

Sensor base with temperature and humidity sensors

SXWSBTHXXSXX

90

Sensor base with temperature and CO 2 sensors

SXWSBTXCXSXX

490

Sensor base with temperature, humidity, and CO 2 sensors

SXWSBTHCXSXX

490

Blank cover

SXWSCBXSELXn a

0

Blank cover with occupancy sensor

SXWSCBPSELXn a

20

3-button cover (buttons for override and setpoint control)

SXWSC3XSELXn a

190

3-button cover (buttons for override and setpoint control) with occupancy sensor

SXWSC3PSELXn a

210

Touchscreen display cover

SXWSCDXSELXn a

190

Touchscreen display cover with occupancy sensor

SXWSCDPSELXn a

210

Touchscreen display cover with light control buttons

SXWSC2XSELXn a

190

Touchscreen display cover with light control buttons and occupancy sensor

SXWSC2PSELXn a

210

Touchscreen display cover with light and blind control buttons

SXWSC4XSELXn a

190

Touchscreen display cover with light and blind control buttons and occupancy sensor

SXWSC4PSELXn a

210

Complete SpaceLogic Sensor model with temperature sensor, buttons for override and setpoint control, and LCD display cover

SXWSATXXXSLn a

80

Complete non-communicating b SpaceLogic Sensor model with resistive temperature sensor (10 kohm type 3 thermistor) and blank cover

SLAnXXX c

SXWSATXXXRXX d

0

SpaceLogic Bluetooth Adapter e

SXWBTAECXX10001

300 e

  1. The last character (“n”) of this model number indicates the housing: X (Medium matte white), W (Optimum glass white), or B (Optimum glass black).
  2. The SpaceLogic resistive temperature sensor is not designed to be connected to the sensor bus, but instead is connected to I/O points/terminals on the BACnet/IP controller using a two-wire connection.
  3. The fourth character (“n”) of this model number indicates the housing: S (Medium matte white), W (Optimum glass white), or B (Optimum glass black).
  4. The model number SXWSATXXXRXX is replaced by SLASXXX.
  5. The SpaceLogic Bluetooth Adapter is only temporarily connected to the SpaceLogic Sensor for commissioning and servicing, so it is not necessary to include the adapter in the power budget.

To summarize the power conditions, the sensor bus supports the following key SpaceLogic Sensor combinations:

  • Blank covers: Up to four sensors of any combination of sensor base types

  • 3-button and touchscreen covers:

    • Up to two sensor bases with CO 2 option

    • Up to four sensor bases without CO 2 option

  • SpaceLogic LCD temperature sensors: Up to four sensors are supported

Note:

The RS-485 Power Adapter can be used to supply 24 VDC power to the MP controller sensor bus so that the maximum number of sensor bases with CO 2 option can be increased from two to four sensor bases. The adapter can be ordered from Schneider Electric using the part number SXWNISORS485P10001.

 
action_zoom_plus_stroke Examples with one SpaceLogic Sensor and four SpaceLogic Sensor devices connected to an MP-C controller in a daisy-chain configuration
Figure: Examples with one SpaceLogic Sensor and four SpaceLogic Sensor devices connected to an MP-C controller in a daisy-chain configuration

Each SpaceLogic Sensor has two 2-position DIP switches, which are used to give the sensor a unique address on the sensor bus. An incorrectly configured or improper DIP switch can cause two sensors to have the same address on the sensor bus, which means that both sensors will be offline. For more information, see SpaceLogic Sensors .

Notice

LOSS OF COMMUNICATION

Ensure that the address DIP switches on the SpaceLogic Sensor are configured to give the sensor a unique address on the sensor bus.

Failure to follow these instructions can result in loss of communication.

Note:

SpaceLogic Sensor devices connected to the sensor bus through a daisy-chain configuration can be assigned addresses regardless of the order in which the sensors appear in the daisy chain. For example, sensor number 1 can have the address 4, sensor number 2 can have the address 3, and so on.

Show More
action_close

The MP-V sensor bus allows SpaceLogic Sensor devices to be connected to the controller.

Notice

LOSS OF COMMUNICATION

  • Ensure that the total length of the sensor bus does not exceed 61 m (200 ft).

  • Use a Cat 5 or higher unshielded twisted pair cable with eight conductors (four twisted pairs), a cross-sectional area of 22 to 26 AWG (0.34 to 0.14 mm 2 ), and a rating that meets the requirements of the target environment.

Failure to follow these instructions can result in loss of communication.

Note:

The following description applies only for MP-V controllers with part numbers SXWMPV7AX10002 and SXWMPV9AX10002. For more information, see Differences Between MP-V Hardware Versions .

By default, the MP-V controller's RS-485 Com A port is configured and allocated for the sensor bus. For more information, see MP-V Communication Ports .

 
action_zoom_plus_stroke Location of the RS-485 Com A port on the MP-V controllers
Figure: Location of the RS-485 Com A port on the MP-V controllers
Note:

When connecting SpaceLogic Sensor devices to the sensor bus through a daisy-chain configuration, the sensor bus ports on the SpaceLogic Sensor are interchangeable.

Description

Model Number

Power (mW)

Sensor base with temperature sensor

SXWSBTXXXSXX

90

Sensor base with temperature and humidity sensors

SXWSBTHXXSXX

90

Sensor base with temperature and CO 2 sensors

SXWSBTXCXSXX

490

Sensor base with temperature, humidity, and CO 2 sensors

SXWSBTHCXSXX

490

Blank cover

SXWSCBXSELXn a

0

Blank cover with occupancy sensor

SXWSCBPSELXn a

20

3-button cover (buttons for override and setpoint control)

SXWSC3XSELXn a

190

3-button cover (buttons for override and setpoint control) with occupancy sensor

SXWSC3PSELXn a

210

Touchscreen display cover

SXWSCDXSELXn a

190

Touchscreen display cover with occupancy sensor

SXWSCDPSELXn a

210

Touchscreen display cover with light control buttons

SXWSC2XSELXn a

190

Touchscreen display cover with light control buttons and occupancy sensor

SXWSC2PSELXn a

210

Touchscreen display cover with light and blind control buttons

SXWSC4XSELXn a

190

Touchscreen display cover with light and blind control buttons and occupancy sensor

SXWSC4PSELXn a

210

Complete SpaceLogic Sensor model with temperature sensor, buttons for override and setpoint control, and LCD display cover

SXWSATXXXSLn a

80

Complete non-communicating b SpaceLogic Sensor model with resistive temperature sensor (10 kohm type 3 thermistor) and blank cover

SLAnXXX c

SXWSATXXXRXX d

0

SpaceLogic Bluetooth Adapter e

SXWBTAECXX10001

300 e

  1. The last character (“n”) of this model number indicates the housing: X (Medium matte white), W (Optimum glass white), or B (Optimum glass black).
  2. The SpaceLogic resistive temperature sensor is not designed to be connected to the sensor bus, but instead is connected to I/O points/terminals on the BACnet/IP controller using a two-wire connection.
  3. The fourth character (“n”) of this model number indicates the housing: S (Medium matte white), W (Optimum glass white), or B (Optimum glass black).
  4. The model number SXWSATXXXRXX is replaced by SLASXXX.
  5. The SpaceLogic Bluetooth Adapter is only temporarily connected to the SpaceLogic Sensor for commissioning and servicing, so it is not necessary to include the adapter in the power budget.

To summarize the power conditions, the sensor bus supports the following key SpaceLogic Sensor combinations:

  • Blank covers: Up to four sensors of any combination of sensor base types

  • 3-button and touchscreen covers:

    • Up to two sensor bases with CO 2 option

    • Up to four sensor bases without CO 2 option

  • SpaceLogic LCD temperature sensors: Up to four sensors are supported

Note:

The RS-485 Power Adapter can be used to supply 24 VDC power to the MP controller sensor bus so that the maximum number of sensor bases with CO 2 option can be increased from two to four sensor bases. The adapter can be ordered from Schneider Electric using the part number SXWNISORS485P10001.

 
action_zoom_plus_stroke Examples with one SpaceLogic Sensor and four SpaceLogic Sensor devices connected to an MP-V controller in a daisy-chain configuration
Figure: Examples with one SpaceLogic Sensor and four SpaceLogic Sensor devices connected to an MP-V controller in a daisy-chain configuration

Each SpaceLogic Sensor has two 2-position DIP switches, which are used to give the sensor a unique address on the sensor bus. An incorrectly configured or improper DIP switch can cause two sensors to have the same address on the sensor bus, which means that both sensors will be offline. For more information, see SpaceLogic Sensors .

Notice

LOSS OF COMMUNICATION

Ensure that the address DIP switches on the SpaceLogic Sensor are configured to give the sensor a unique address on the sensor bus.

Failure to follow these instructions can result in loss of communication.

Note:

SpaceLogic Sensor devices connected to the sensor bus through a daisy-chain configuration can be assigned addresses regardless of the order in which the sensors appear in the daisy chain. For example, sensor number 1 can have the address 4, sensor number 2 can have the address 3, and so on.

Notice

LOSS OF COMMUNICATION

Locate the sensor bus wiring away from external electromagnetic noise sources such as high voltage cables and Variable Frequency Drives (VFDs) for AC motors.

Failure to follow these instructions can result in loss of communication.

Notice

EQUIPMENT DAMAGE

Do not connect an Ethernet cable from the MP controller RS-485 Com A port, directly to an external Ethernet switch or router.

Failure to follow these instructions can result in equipment damage.

Note:

The labeling of the RS-485 port differs between different hardware versions of the MP-V controller models. In previous versions, the port is labeled “Sensor Bus”. For more information, see Differences Between MP-V Hardware Versions .

Note:

The labeling of the RS-485 port differs between different versions of the MP-C controller models. In previous versions, the port is labeled “Sensor Bus”.

To connect SpaceLogic Sensor devices to an MP controller
  1. Install the SpaceLogic Sensor and connect a Cat 5 (or higher) unshielded, straight-through wired cable with eight conductors (four twisted pairs) to one of the two RJ45 receptacles on the sensor. Use a cable with the wire size (cross-sectional area) 22 to 26 AWG (0.34 to 0.14 mm²).

    For more information, see SpaceLogic Sensors - SXWS Sensor Base - Installation Instructions .

    For more information, see SpaceLogic Sensors - SXWS LCD Temperature Sensors - Installation Instructions .

  2. Connect the other end of the cable to the RS-485 Com A port on the MP controller.

     
    action_zoom_plus_stroke
  3. When an additional SpaceLogic Sensor is needed, install the sensor and connect the other end of the cable to the unused RJ45 receptacle on the previous sensor.

    Note:

    When connecting SpaceLogic Sensor devices to the MP controller's sensor bus through a daisy-chain configuration, the sensor bus ports on the SpaceLogic Sensor are interchangeable.

     
    action_zoom_plus_stroke
  4. Repeat step 3 to install a third and fourth SpaceLogic Sensor, if the power constraints of the sensor bus allow this for the selected combination of cover and sensor base type.

  5. Ensure that the two 2-position address DIP switches on each SpaceLogic Sensor are configured to give the sensor a unique address on the sensor bus.

    For more information, see SpaceLogic Sensors - SXWS Sensor Base - Installation Instructions .

    For more information, see SpaceLogic Sensors - SXWS LCD Temperature Sensors - Installation Instructions .

    For more information, see Configuring a SpaceLogic Sensor .

  • MP-C Controllers
  • MP-V Controllers
  • MP-C Sensor Bus
  • MP-V Sensor Bus
  • MP-V Models
  • Differences Between MP-V Hardware Versions
  • MP-C Models
  • SpaceLogic Sensor or MP Controller Sensor Bus Is Not Operational
  • Configuring a SpaceLogic Sensor