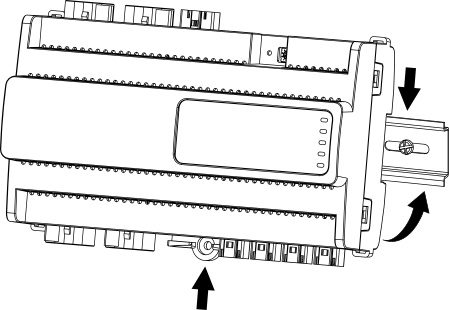
The RP Series expansion module can be installed on a DIN rail or flat surface.
A DIN rail is a common and convenient technique for installing the RP Series expansion module along with other associated control and monitoring devices. The most efficient ventilation is achieved with the wall-mounted DIN rail oriented horizontally and with adequate space provided between the RP Series expansion module rail and adjacent rails or other devices.
The RP Series expansion module is typically installed horizontally (on a DIN rail going from left to right), with the device label text in the upright position reading left to right.
action_zoom_plus_stroke

Figure:
RP Series expansion module installed on a horizontal DIN rail
The restrictions on installing the device in other orientations, as well as the normal operating conditions, differ between different types of RP Series expansion modules.
|
Notice
|
|
EXPANSION MODULE DAMAGE
Follow the installation orientation restrictions that apply to the specific RP Series expansion module.
Failure to follow these instructions can result in equipment damage.
|
Table: Normal Operating Conditions for Different Types of RP Series Expansion Modules
|
Type of Module
|
Ambient Temperature
|
|
Light modules, high-voltage blind modules, and relay modules
|
0 to 50 °C (32 to 122 °F)
|
|
Low-voltage blind modules
|
0 to 40 °C (32 to 104 °F)
|
Under normal operating conditions of 0 to 50 °C (32 to 122 °F), the light modules and high-voltage blind modules can be installed in the following orientations:
Horizontally (on a DIN rail going from left to right), with the device label text in the upright position reading left to right. See “a” in the following figure.
Vertically (on a DIN rail going from top to bottom), which means that the device is rotated +90 degrees or -90 degrees from the horizontal position. See “b” and “c” in the following figure.
Face down from a ceiling. See “d” in the following figure.
Rotated 180 degrees from the horizontal position with device label text up and down. See “e” in the following figure.
Face up on a horizontal surface. See “f” in the following figure.
action_zoom_plus_stroke

Figure:
Installation orientation restrictions for light modules and high-voltage blind modules in normal conditions
Under normal operating conditions of 0 to 40 °C (32 to 104 °F), the low-voltage blind modules can be installed in the following orientations:
Horizontally (on a DIN rail going from left to right), with the device label text in the upright position reading left to right. See “a” in the following figure.
Vertically (on a DIN rail going from top to bottom), which means that the device is rotated +90 degrees or -90 degrees from the horizontal position. See “b” and “c” in the following figure.
Face down from a ceiling. See “d” in the following figure.
Rotated 180 degrees from the horizontal position with device label text up and down. See “e” in the following figure.
The only installation orientation that is not supported for the low-voltage blind modules is when the device is installed face up on a horizontal surface. See “f” in the following figure. In the face up position, the low-voltage blind module's thermal specifications may be exceeded, which can damage the module.
action_zoom_plus_stroke

Figure:
Installation orientation restrictions for low-voltage blind modules in normal conditions
The RP Series expansion modules can be installed in a standard DIN enclosure.
Important:
Local panel regulations should be followed when installing the RP Series expansion modules in a distribution panel.
When installing RP Series expansion modules in a DIN enclosure or cabinet, it is recommended to provide ample space between the DIN rails and modules for sufficient ventilation.
action_zoom_plus_stroke

Figure:
RP Series expansion modules installed on horizontal DIN rails in a cabinet
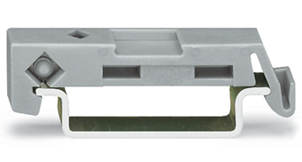
To help prevent the device from sliding down or sideways on the DIN rail, install an end clip for DIN 35 (part number SXWDINEND10001) tightly against the bottom or rightmost device on the rail. The end clip is easily removed if you bend the snap lock open with a screwdriver.
|
Notice
|
|
EXPANSION MODULE DAMAGE
Use an end clip (part number SXWDINEND10001) when you install the RP Series expansion module on a vertical DIN rail.
Failure to follow these instructions can result in equipment damage.
|
action_zoom_plus_stroke

Figure:
End clip for DIN 35 fixed across the DIN rail
All RP Series expansion modules have connectors that allow the matching, external connectors (and cables) for the power supply, outputs, and digitals input to be plugged in on site quickly and easily.
For more information, see RP Series Expansion Module Pluggable Connectors
.
action_zoom_plus_stroke

Figure:
Connectors for outputs (example), power input, and digital inputs
The RP Series expansion module has four anchor points that can be used to fasten cable ties or other accessories for bundling light weight wires.
action_zoom_plus_stroke

Figure:
Anchor points for cable ties
It is recommended to always anchor excess cabling, in accordance with the local regulations, to alleviate all stresses on connectors and cable assemblies. When excess cabling is coiled and left suspended only from the module’s connectors, damage can occur to connectors and/or cable assemblies.
|
Notice
|
|
CONNECTOR OR CABLE ASSEMBLY DAMAGE
Anchor the excess cabling to alleviate all stresses on connectors and cable assemblies.
Failure to follow these instructions can result in equipment damage.
|


 RP Series Expansion Module Device Installation
 Installing an RP Series Expansion Module on a Flat Surface


