earth_america
user_standard Log on
action_search_stroke
earth_america
Log on to rate and give feedback 1 2 3 4 5 Log on to rate
0
How to

How to


Products: AS-B, AS-P, RP-C, Wireless Adapter - Advanced
Functionalities: Hardware
Product version: 3.2
6/10/2022

Installing Wireless Adapter - Advanced on an Enclosure Exterior

You install Wireless Adapter - Advanced on the exterior of a metal enclosure and connect the adapter to an RP-C controller or SmartX AS-P server to add Zigbee wireless connectivity to the controller or server.

Show More
action_close

Wireless Adapter - Advanced is a USB-based wireless adapter that enables Zigbee TM wireless connectivity with an RP-C controller or SmartX AS-P server, extending the controller's point count and bringing flexibility in retrofit applications.

The adapter can communicate over the Zigbee wireless protocol with up to 10 wireless devices.

The adapter works seamlessly within the EcoStruxure BMS so that Zigbee objects become easily available to the user.

The adapter’s compact design allows it to plug in to RP-C controllers or SmartX AS-P servers in tight spaces and the optional mounting cradle, wall plate, and USB cable extension allow for the choice of a wall, ceiling, or exterior of the enclosure mount to maximize the transmission and reception of signals from distributed Zigbee devices.

 
action_zoom_plus_stroke  Adapter with mounting cradle and wall plate
Figure: Adapter with mounting cradle and wall plate

The adapter is plugged into the USB host port on the RP-C controller or SmartX AS-P server. The adapter is powered by the RP-C controller or SmartX AS-P server, which also provides transient protection to the adapter.

 
action_zoom_plus_stroke  Adapter installed on an enclosure exterior and connected to the USB host port of an RP-C controller
Figure: Adapter installed on an enclosure exterior and connected to the USB host port of an RP-C controller

The adapter must be professionally installed to avoid harmful interference to radio communications and to maintain the regulatory compliance and approvals for the device. For more information, see Wireless Adapter - Advanced Regulatory Compliance and Approvals .

Specifications

Electrical
DC input supply voltage
5 VDC (USB) a
a) Connected to and powered by the USB 2.0 host port on the RP-C controller or SmartX AS-P server.
Maximum power consumption
0.3 W
Wireless connectivity
Communication protocol
Zigbee
Frequency band
2.4 GHz (ISM band), compliant with IEEE Standard 802.15.4
Maximum total number of Zigbee Green Power devices connected to the wireless network
10
For more information, see Supported Wireless Devices .
Maximum output power
+10 dBm
Maximum communication distance
Line-of-sight: 50 m (164 ft)
Antenna
Integrated antenna
Environment
Ambient temperature, operating
0 to 50 °C (32 to 122 °F)
Ambient temperature, storage
-40 to +70 °C (-40 to +158 °F)
Humidity
Maximum 95 % RH non-condensing
Material
Plastic flame rating
UL94 HB
Plenum rating
UL 2043
Ingress protection rating
IP 20
Mechanical
Dimensions, adapter
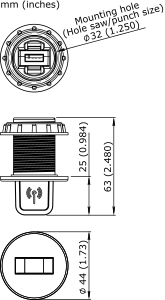
See drawing below
 
action_zoom_plus_stroke
Dimensions, mounting cradle and wall plate
See drawing below
 
action_zoom_plus_stroke
Weight
Adapter: 7.57 g (0.267 oz)
  
Cradle and nut: 21.35 g (0.753 oz)
  
Cradle, nut, and wall plate: 33.40 g (1.178 oz)
Installation
Connection to USB host port on RP-C controller or SmartX AS-P server
  
Indoor use only
Installation options
Enclosure exterior
  
Drop ceiling with mounting cradle (optional)
  
Wall with wall plate (optional)
Maximum USB 2.0 cable length
3 m (10 ft)
Hardware
CPU type
ARM Cortex-M4 with Floating Point Unit (FPU)
Frequency
38.4 MHz
SRAM (embedded)
64 KB
Flash memory (embedded)
512 KB
Connectors
USB 2.0, type-A connector

To install Wireless Adapter - Advanced on an enclosure exterior
  1. Refer to the dimensional drawings before installing the adapter.

     
    action_zoom_plus_stroke
  2. Ensure that you have the proper mounting hardware.

  3. Find a suitable location on the enclosure for mounting the adapter.

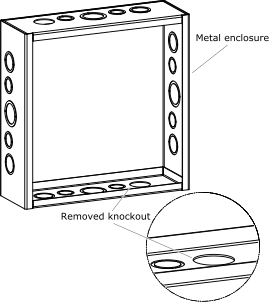
  4. Make a hole to mount and fasten the cradle using one of the following methods:

    • Create a 32 mm (1.250 inches) diameter mounting hole in the front panel of the metal enclosure.

    • Remove a pre-punched knockout, a punched out, removable disc on the sides of the metal enclosure.

     
    action_zoom_plus_stroke
    Tip:

    You can use a metal hole punch to create the hole in the front panel.

    Tip:

    You can use a screwdriver and hammer to break out the knockout, then twist off the knockout with pliers.

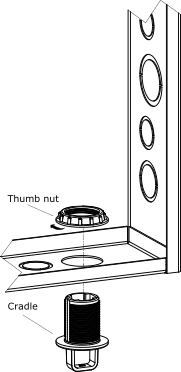
  5. Mount the cradle and fasten it using the thumb nut.

     
    action_zoom_plus_stroke
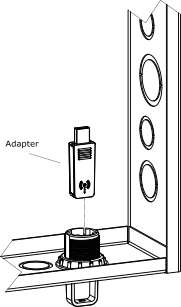
  6. Install the adapter in the cradle.

     
    action_zoom_plus_stroke
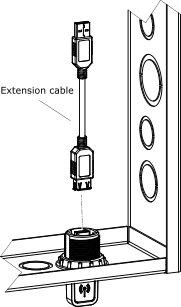
  7. Connect the SmartX USB extension cable to the adapter.

     
    action_zoom_plus_stroke
    Important:

    Use one of the following USB cables ordered from Schneider Electric:

    • SmartX USB extension cable of length 1 m (3 ft) (part number SXWUSBCBL10001)

    • Plenum rated SmartX USB extension cable of length 3 m (10 ft) (part number SXWUSBCBL10002)

  8. Connect the SmartX USB extension cable to the USB host port on the RP-C controller or SmartX AS-P server.

     
    action_zoom_plus_stroke
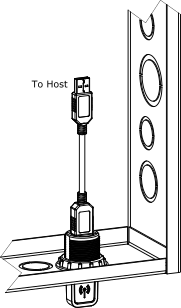
You can now use the adapter.

  • Wireless Adapter - Advanced
  • Installing Wireless Adapter - Advanced in a Dropped Ceiling
  • Installing Wireless Adapter - Advanced on a Wall