Concept
Zigbee Modules Device Installation
The RP controller expansion Zigbee modules are designed to be installed on a flat surface on a ceiling.
The Zigbee modules must be professionally installed to comply with the following rules and regulations:
2014/53/EU Radio Equipment Directive (RED) of the European Union (EU)
UK Statutory Instruments 2017 No. 1206 – The Radio Equipment Regulations 2017
Pour plus d'informations, voir Zigbee Modules Regulatory Compliance and Approvals .
The Zigbee module and its integrated antenna must be installed to provide a separation distance of at least 20 cm (8 in.) from all persons and must not be co-located or operating in conjunction with any other antenna or transmitter. Information on recommended RF exposure limits can be obtained from Health Canada's website, www.canada.ca/en/health-canada .
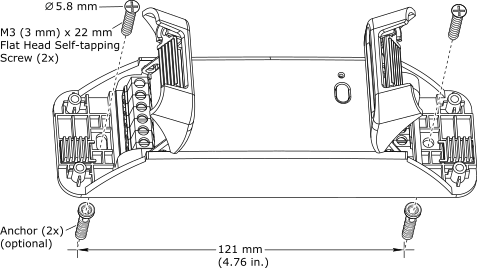
To install a Zigbee module on a ceiling, you drill two holes in the ceiling with a distance of 121 mm (4.7 inches) between the holes, and fasten the device using two M3 (3 mm) x 22 mm Phillips flat head self-tapping screws with a 5.8 mm screw head diameter. The device has two holes in the back cover to facilitate installation. The two screws are delivered with the device. Pour plus d'informations, voir Installing an RP Controller Expansion Zigbee Module on a Ceiling .

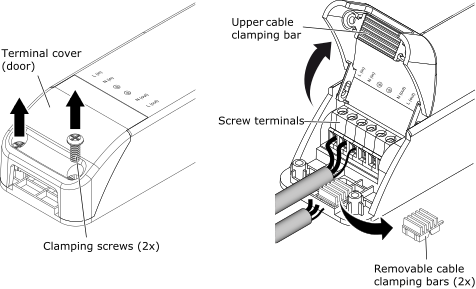
The screw terminals on the left and right side of the Zigbee module are covered by two terminal covers (doors), which are intended to reduce the access to the screw terminals and wires. To open or close a terminal cover, you need to unscrew or screw in the two clamping screws. These two screws are also used to fasten the cables to the device. The device is equipped with an upper cable clamping bar on the inside of the terminal covers, and four lower cable clamping bars are delivered with the device, to facilitate the fastening of the cables. The lower, removable cable clamping bars can be mounted or removed to fit cables of smaller or larger diameter. Pour plus d'informations, voir Wiring a Screw Terminal on an RP Controller Expansion Zigbee Module .

 RP Controller Expansion Zigbee Modules
 RP-C-EXT-ZB-DALI
 RP-C-EXT-ZB-0-10V
 Zigbee Modules Regulatory Compliance and Approvals
 Installing an RP Controller Expansion Zigbee Module on a Ceiling
 Wiring a Screw Terminal on an RP Controller Expansion Zigbee Module
 Précaution
 Danger