earth_america
user_standard Log on
action_search_stroke
earth_america
Log on to rate and give feedback 1 2 3 4 5 Log on to rate
0
How to

How to


Products: AS-B, Enterprise Central, Enterprise Server, AS-P, WorkStation, Virtual Project Servers
Functionalities: Trends
Product version: 3.2, 3.3, 2022
10/15/2020

Configuring an Interval Trend Log

You configure the properties of an interval trend log to meet the unique needs of your site.

Show More
action_close

​The interval trend log collects data at a specific time interval. Each logged value is stored as a record in the trend log. Use this trend log when the logging interval is less than 1 hour.

You create interval trend logs using WorkStation or WebStation. In WorkStation, you configure the properties of the interval trend log to meet the specific needs of your site. 

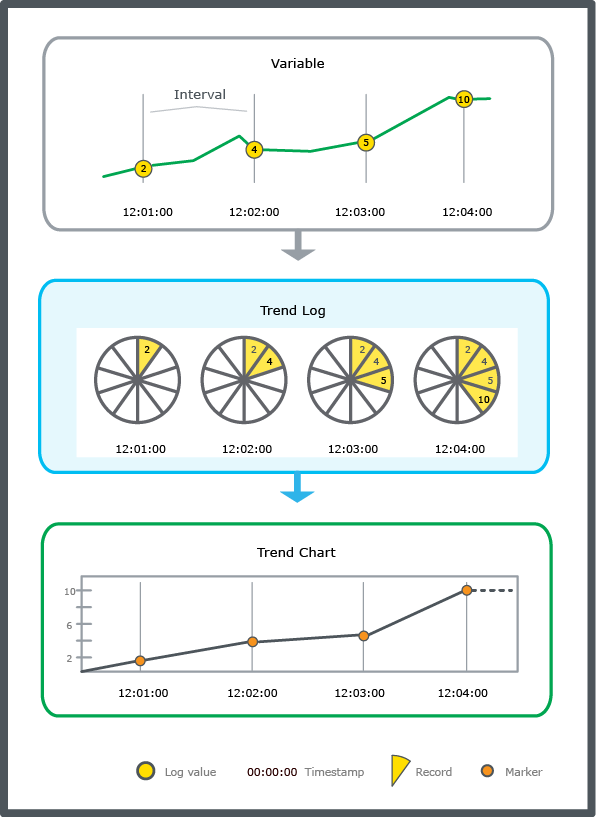
For example, in the figure below, the interval trend log records a variable every minute. The records are printed in a trend chart. The interval trend log does not record the values between the intervals.

 
action_zoom_plus_stroke Interval trend log schematic.
Figure: Interval trend log schematic.

The interval of the interval trend log is aligned with the activation time of the trend. For example, if the activation time is 09:01:00 and the interval is 15 minutes, the trend will log at 09:16:00, 09:31:00, 09:46:00, and so on.

Interval Time Zone

By default, the interval log uses UTC to determine when to take the next log sample. When the interval is longer than 1 hour and you want to continue to log that interval after a Daylight Savings Time change, use Server Local Time. For example, the log interval is every 24th hour at midnight and you want to continue to log at midnight even after a DST change, so you use Server Local Time. During the DST change in the Spring, the log sample will register after 23 hours. After the DST change in the Autumn, the log sample will register after 25 hours.

Interval Trend Log Delta

An interval trend log with delta can reduce the storage of similar records, and may not fill up the storage capacity as quickly as an interval trend log with no delta.

An interval trend log with delta checks the monitored value at each interval and records the new value if it differs from the previously recorded value by more than the delta. Delta is the difference between the current variable value and the last log value. To log a variable according to the time interval, use a delta of zero.

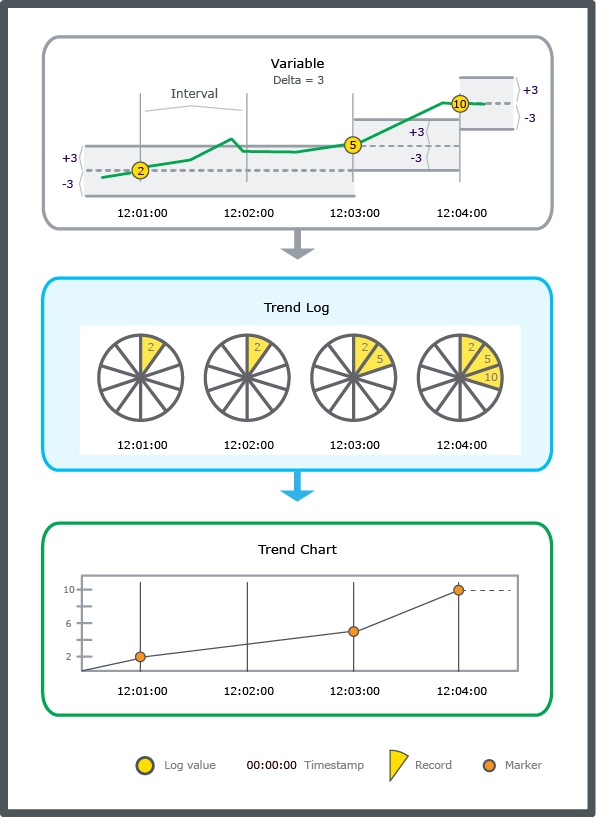
For example, in the figure below, the interval trend log records a variable every minute but only if the variable exceeds or falls below the delta of 3. The records are printed in a trend chart. Notice that the interval trend log with delta does not record the values between the intervals, or on intervals where the variable is within the delta.

Note:
  • To log a variable only according to the time interval, set Delta to zero.

 
action_zoom_plus_stroke Interval trend log with delta schematic.
Figure: Interval trend log with delta schematic.

If an interval trend log has a delta and a calculation method that uses periods, make sure the period contains the required amount of records to generate a correct calculation. If the value does not differ from the previously logged value by more than the delta within the period, then none or too few values are recorded for the calculation.

Note:
  • Adapt the period so it contains the required amount of records to generate a correct calculation.

  • If a calculation method is connected to an interval trend log with delta, make sure that the period and delta are adapted for the calculation.

Interval trend log meter functionality

An interval trend log can be created with initial meter settings. The interval trend log supports the meter change command and meter consumption calculation. You can view the last meter change information on the interval trend log object. For more information, see Meter Function .

To configure an interval trend log
  1. In WorkStation, in the System Tree pane, click the interval trend log you want to configure.

  2. On the File menu, click Properties .

  3. In the properties dialog box, click the Basic tab.

  4. Edit the basic properties:

    Table: Interval Trend Log Properties - Basic Tab

    Property

    Description

    Status

    Displays the status of the trend log.

    Enabled

    Displays True if the trend log is enabled.

    Logged variable

    Enter the variable you want to log.

    Delta

    Select the minimum value change that triggers a new record.

    For more information, see Interval Trend Log Delta .

    Activation variable

    Enter the variable that makes the trend log start recording values when the variable is True .

    For more information, see Trend Log Activation .

    Activation time

    Specify the time when the trend log is to start recording values.

    For more information, see Trend Log Activation .

    Interval

    Type how often to log the variable. The interval defines the time between two log records.

    Log size

    Select the number of records to store before old records are overwritten, including internal records generated by the trend log.

    For more information, see Log Record Storage .

    Clear when enabled

    Select True to clear the trend log when it is enabled.

  5. Click the Meter Info tab.

  6. Edit the meter properties:

    Table: Meter Info Tab

    Property

    Description

    Is meter log

    Select True if the trend log meter function is active.

    For more information, see Meter Function .

    Meter change time

    Enter the time when the meter was changed.

    Meter change user

    Enter the name of the user account that changed the meter.

    End time

    Enter the time when the old meter was replaced.

    End value

    Enter the value the old meter had when it was replaced.

    Start time

    Enter the time when the new meter was installed.

    Start value

    Enter the value of the new meter when it was installed.

    Meter constant

    Enter the constant of the new meter. If the meter counts in kilo (10 3 ), the constant is 1000.

    Min value

    Enter the first value of the new meter after roll-over.

    Max value

    Enter the last value of the new meter before roll-over.

  7. Click OK .

  • Interval Trend Logs
  • Interval Trend Log Properties – Basic Tab
  • Configure Dialog Box – Configuration Tab
  • Interval Trend Log Delta
  • Trend Log Activation
  • Configure Dialog Box – Operation Tab
  • Log Record Storage
  • Meter Function
  • Editing the Interval of an Interval Trend Log
  • Editing the Delta in an Interval Trend Log
  • Trend Log Does Not Start Record Due to the Start Condition