earth_america
action_search_stroke
earth_america
Log on to rate and give feedback 1 2 3 4 5 Log on to rate
0
Как

Как


Продукты: AS-B, IP-IO
Функции: Аппаратное обеспечение
Версия продукта: 2.0, 2.1, 3.0, 3.1, 3.2, 3.3, 2022, 2023, 2024, 7.0
13.03.2019

Configuring a Digital Input

You use the override display to locally configure a digital input when the input has not been configured through WorkStation.

Показать больше
action_close

In configuration mode, you can locally configure inputs and outputs for temporary use during commissioning of the device. You can configure inputs and outputs that have not been configured through WorkStation.

You can reconfigure, unconfigure, and override a locally configured I/O point using the override display. The I/O configuration is locally stored in the device. The local I/O configuration is not uploaded to the Enterprise Server database and the local I/O configuration does not appear in WorkStation. You can change the I/O configuration using WorkStation. The final I/O configuration must always be done in WorkStation.

To enter the configuration mode, you press and hold down the Home key

 
action_zoom_plus_stroke
for three seconds.

The icons on the I/O List screen indicate which I/O points you can configure, reconfigure, or unconfigure. Более подробную информацию см. Icons . The highlighted I/O point is flashing to indicate that you are in configuration mode.

The Unconfigured icon

 
action_zoom_plus_stroke
indicates an I/O point that you can configure locally.

The Input locally configured icon

 
action_zoom_plus_stroke
and Output locally configured icon
 
action_zoom_plus_stroke
indicate locally configured I/O points, which you can reconfigure or unconfigure.

 
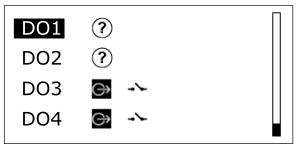
action_zoom_plus_stroke I/O list screen showing two unconfigured outputs and two locally configured outputs
Рисунок: I/O list screen showing two unconfigured outputs and two locally configured outputs

Configure a Universal Input/Output

There are three universal input/output types: Ua, Ub, and Uc. Depending on which of these three types you have, you can locally configure different types of inputs and analog outputs.

Analog output types

Таблица: Analog Output Types Supported by Ua, Ub, and Uc Universal I/O Types

Analog Output Type

Ua

Ub

Uc

Voltage output

X

X

X

Current output

-

-

X

Input types

Таблица: Input Types Supported by Ua, Ub, and Uc Universal I/O Types

Input Type

Ua

Ub

Uc

Digital input

X

X

X

Counter input

X

X

X

Voltage input

X

X

X

Temperature input

X

X

X

Resistive input

X

X

X

2-Wire RTD input

X

X

X

Supervised input

X

X

X

Current input

-

X

X

Thermistor types for temperature inputs

You can configure a temperature input for use with one of the following thermistor types:

  • 10K ACC: 10 kohm Type I (Continuum) thermistor or SpaceLogic/EasyLogic resistive temperature sensor

  • 1.8K TAC: 1.8 kohm Xenta thermistor

  • 10K CSI: 10 kohm Type II (I/NET) thermistor

  • 10K Satchwell: 10 kohm Type III (Satchwell) thermistor

  • 10K S-well linear: 10 kohm linearized (Satchwell D?T) thermistor

  • 10K Invensys: 10 kohm Type IV (FD) thermistor

  • 10K I-sys: 10 kohm linearized Type V (FD with 11 kohm shunt) thermistor

  • 1K Balco: 1 kohm Balco thermistor

  • 20K Honeywell: 20 kohm Honeywell thermistor

  • 2.2K J Controls: 2.2 kohm Johnson Controls thermistor

Circuit types and resistors for supervised inputs

You can configure a supervised input for use with one of the following supervised circuit types:

  • NO Series: Normally Open (NO) circuit with a resistor connected in series with the switch

  • NC Series: Normally Closed (NC) circuit with a resistor connected in series with the switch

  • NO Parallel: Normally Open (NO) circuit with a resistor connected in parallel with the switch

  • NC Parallel: Normally Closed (NC) circuit with a resistor connected in parallel with the switch

  • NO Series/Parallel: Normally Open (NO) circuit with one resistor connected in series with the switch and one resistor connected in parallel with the switch

  • NC Series/Parallel: Normally Closed (NC) circuit with one resistor connected in series with the switch and one resistor connected in parallel with the switch

You also configure the resistor value for the supervised circuit.

Configure a Digital Output

There are three digital output types: relay output, triac output, and high power relay output. Depending on which of these three types you have, you have different options for locally configuring the digital output.

Таблица: Digital Output Types Supported by Relay, Triac, and High Power Relay Outputs

Digital Output Type

Relay Output

Triac Output

High Power Relay Output

Digital Output

X

X

X

Digital Pulsed Output

X

X

X

Tristate Output

X

X

-

Tristate Pulsed Output

X

X

-

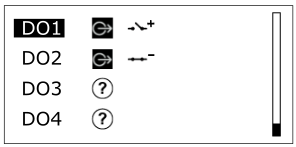
When you configure a digital output as a tristate output, the selected output point and the next output point form a pair.

 
action_zoom_plus_stroke A pair of tristate output points
Рисунок: A pair of tristate output points

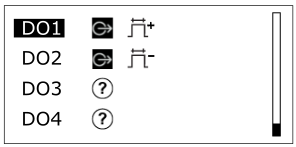
Similarly, when you configure a digital output as a tristate pulsed output, the selected output point and the next output point form a pair.

 
action_zoom_plus_stroke A pair of tristate pulsed output points
Рисунок: A pair of tristate pulsed output points

Configure a Digital Input

A digital input can be locally configured as one of the following types:

  • Digital input

  • Counter input

To configure a digital input
  1. Press and hold down the Home key

     
    action_zoom_plus_stroke
    for three seconds.

  2. Highlight IO Configuration .

     
    action_zoom_plus_stroke
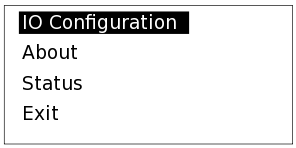
  3. Press the Enter key

     
    action_zoom_plus_stroke
    .

  4. Highlight the digital input point that you want to configure.

     
    action_zoom_plus_stroke
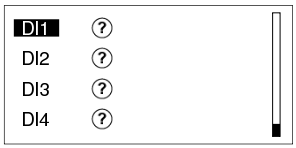
  5. Press the Enter key

     
    action_zoom_plus_stroke
    .

  6. Highlight IN .

     
    action_zoom_plus_stroke
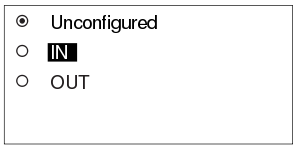
  7. Press the Enter key

     
    action_zoom_plus_stroke
    .

  8. Highlight an input type. Более подробную информацию см. Configure Inputs and Outputs for Temporary Use .

     
    action_zoom_plus_stroke
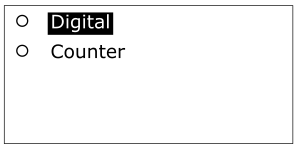
  9. Press the Enter key

     
    action_zoom_plus_stroke
    .

  • Configure Inputs and Outputs for Temporary Use
  • Keys
  • I/O Configuration Screen
  • I/O List Screen
  • I/O Selection Screen
  • Digital Input Configuration Screen
  • Icons
  • Removing a Configuration for an Input or Output
  • Exiting Configuration Mode