earth_america
user_standard Log on
action_search_stroke
earth_america
Log on to rate and give feedback 1 2 3 4 5 Log on to rate
0
How to

How to


Products: Automation Server, AS-B, AS-P, Virtual Project Servers
Functionalities: Localization
Product version: 1.9
12/14/2016

Synchronizing the SmartStruxure Server Device Clock

You configure the SmartStruxure server device to synchronize its clock with a network time server.

Show More
action_close

​Consistent date and timestamping across a network is critical for system wide access control, security, communications, scheduling, alarms, and events. Network time uses the NTP protocol that provides the correct current UTC time.

Network Time on WorkStation and Enterprise Server

The network time settings on WorkStation and Enterprise Server are configured through the operating system settings on which WorkStation or Enterprise Server is installed. For more information on how to configure network time settings, refer to the manufacturer’s manual for the operating system.

Network Time Server on a SmartStruxure Server Device

To configure SmartStruxer server device network time settings, you have to log on to the SmartStruxure server device through WorkStation. When logged in, the SmartStruxure server device has a Date & Time view where you configure the network time server addresses.

When configuring the SmartStruxure server device network time server address, you can define two time server addresses: primary time server and secondary time server. If the SmartStruxure server device fails to connect to the primary time server, it tries to synchronize its clock with the secondary.

Authenticated Network Time Servers

To increase the security of your system, you can use authenticated network time. By using authenticated network time, you decrease the risk that someone will tamper with your time setting.

To be able to use authenticated network time, you connect your SmartStruxure server to an authenticated time server. You need the secure key ID and and key value password that is provided by the authenticated time server administrator.

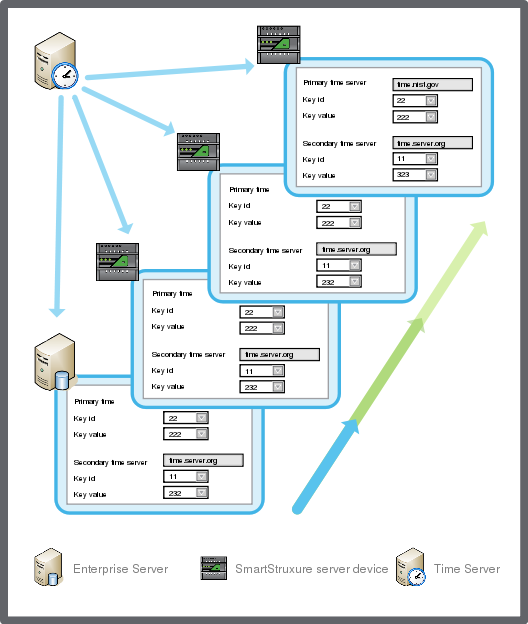
You can use the lead/shadow relationship to transfer the authenticated time server setting and its secure key ID and key value password from the lead server or you can configure the secure time server manually on your SmartStruxure server. When you use the lead/shadow relationship the Enterprise Server transfers the setting for the time server to the SmartStruxure server device. The SmartStruxure server device then uses the authenticated time server configuration to go online and get the correct time from the secure time server.

 
action_zoom_plus_stroke The lead and shadow relationship.  
Figure: The lead and shadow relationship.  

To synchronize the SmartStruxure server device clock
  1. ​In WorkStation, on the Tools menu, click Control Panel .

  2. On the Control Panel toolbar, select the server.

     
    action_zoom_plus_stroke
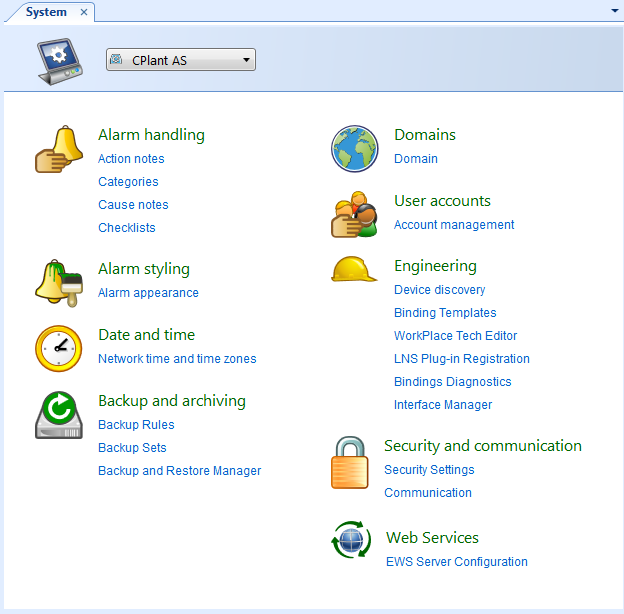
  3. Click Network time and time zones .

  4. In the SmartStruxure server device Date & time view, select Network time synchronization .

     
    action_zoom_plus_stroke
  5. In the Primary time server box, type the address to the primary time server that you want to synchronize the SmartStruxure server device clock with.

  6. In the Secondary time server box, type the address to the time server that you want to synchronize the SmartStruxure server device clock with if the primary time server is not available.

  7. Click the Save button

     
    action_zoom_plus_stroke
    .

  • Network Time
  • Time and Time Zone Configuration in Automation Server
  • SmartStruxure Server Device – Date & Time View
  • Manually Changing the SmartStruxure Server Device Time and Date
  • Changing the Time Zone of a SmartStruxure Server
  • Creating a Custom Time Zone of a SmartStruxure Server